How to wash your car: Step-by-step guide
Some drivers only seem to reach for a bucket and sponge when they want to prepare their car for resale. However, if you want to get the most out of your motor, you should get into the habit of washing it regularly. This should help to preserve its condition and reduce the effects of depreciation.
Proactively removing dirt, grime and other environmental contaminants before they can damage the paintwork and finish should keep your motor looking great for longer. Of course, the benefits are not merely cosmetic; regular cleaning will also help to prevent rust and corrosion, protecting the structural integrity of your vehicle.
Whilst the results of car washing, valet and detailing services are often impressive, you probably don’t want to shell out every time your car gets a little grimy. Besides, there’s a lot to be said for the sense of accomplishment gained after a good old-fashioned DIY car wash!
Get a free valuation
Choosing the right time and conditions to wash your car
In this complete guide, we’ll walk you through how to clean your motor at home, including the most effective tools and techniques, how to remove mould – and rejuvenate your interior.
Before we get started, you’re probably wondering, "How often should I wash my car?” Although there’s no singular answer to this question, you should consider giving your motor a thorough wash at least once a fortnight – or more often if you regularly traverse mud-caked rural roads.
Wait for the right conditions
-
You might think that a scorching summer’s afternoon would provide the perfect conditions for washing your motor. However, when the weather is too hot, car shampoo can dry before you get the chance to rinse it away. This can leave streaks and dullen the appearance of your paintwork.
-
In the middle of a heatwave, you’re better off waiting till the morning or early evening when temperatures are cooler.
Avoid cleaning your car when it’s raining. Rain can be acidic and may contain dirt particles (and other contaminants) that can damage the paintwork.
-
You should wash your car after it has rained to remove these contaminants.
-
Avoid washing your car in icy conditions; the stark difference in temperature between the car and hot water could crack your windscreen. What’s more, these conditions can make it harder to dry your car - and leave unwanted streaks.
Essential Tools and Products
At a minimum, you’ll need the following tools and equipment to clean your car:
-
Brushes and buckets.
-
A pressure washer or a garden hose with a spray gun extension.
-
A wash mitt.
-
Car shampoo.
-
A microfibre drying towel.
In this section, we’ll also highlight some optional products that you can use to get your car looking even better:
Wheels and Tyres
-
Use an alloy wheel cleaner to restore your wheels’ shine. These products contain chemicals that turn wheels red and break down any dirt and grime.
-
You can also use a wheel cleaner and an alloy wheel brush to remove any dirt from your tyres.
-
To get your tyres showroom clean, try using a barrel brush for the final finish.
Washing Your Car
-
Invest in a good quality sponge to scour dirt and grime from your car’s bodywork.
-
A ‘wash and wax’ shampoo will help to loosen dirt and achieve that coveted showroom finish.
Freshen Your Paintwork
-
A liberal coating of ‘snow foam’ can lift stubborn dirt and other contaminants from your car’s paintwork to keep it looking its best.
Polishing Your Car
-
Choosing a good quality car polish will help you achieve a flawless finish. Polish can be applied and then buffed out, leaving a wax coating. A good polish will enhance your car’s looks whilst providing valuable protection from UV rays.
Interior cleaning tips
-
Car wipes can be used to clean your interior, including the dashboard and seats.
-
A car vacuum can help you lift dirt and debris from difficult spots.
-
Upholstery cleaner works well with a variety of fabrics, including cloth, microfibre, and polyester.
-
Delicate fabrics such as velvet, silk, and faux leather may require special care.
-
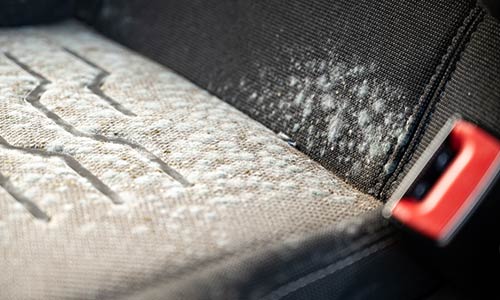
If you have leather upholstery, you should use a specialised leather cleaner. There are products available that can help you achieve a gloss finish.
-
Alcantara seats should be cleaned with a dedicated Alcantara cleaner. Scrub gently and avoid soaking the material.
-
Always read the label before use to avoid damaging your seats.
Step-by-Step Car Washing Guide
In this section, we’ll explain how to wash and clean your car at home. We’ll begin by walking you through how to wash your car quickly. Then, we’ll cover how to clean your car comprehensively inside and out. Want to achieve a showroom clean? You’ll probably need to set aside several hours or perhaps even a full day, depending on your car’s current condition.
Quick Wash
-
Step 1: Pre-rinse Your Car
First, you’ll need to pre-rinse your car. A pressure-washer is ideal for this task, but a garden hose with a spray attachment will also suffice. Starting from the top, rinse away any loose dirt from the bodywork and between the panels. Wash the inside of the wheel arches and wheels. Any larger pieces of debris might damage your car’s paintwork if they get caught in your wash mitt, so it’s a good idea to remove them now.
-
Step 2: Wash Your Car
For the next step, you’ll need two buckets of water and a wash mitt. Add your chosen car shampoo to one of the buckets – and leave the other filled with fresh water. Soak your mitt in the shampoo bucket and carefully wash any remaining dirt from the paintwork in a sideways motion. Although you might instinctively use a circular motion, cleaning sideways will minimise the risk of swirl marks, whilst ensuring an even application. Removing stubborn stains may require two or more attempts. Make sure you rinse the mitt clean in the water bucket before re-lathering in the shampoo bucket.
-
Step 3: Rinse and Dry
Rinse your car with the pressure washer or hose, starting from the top down. Once you have removed the shampoo, carefully dry your car with a cloth. If possible, use a microfibre cloth, as these are less likely to damage your paintwork than a chamois leather cloth or a water blade. Dry your car gently, using a sideways motion – or pat the vehicle dry if you prefer.
-
Step 4: Clean the Exterior Glass
When cleaning the glass, you can try a specialised window cleaner or polish - although you might find a simple household window cleaner to be just as effective. When left untreated, the exterior part of the glass will develop a layer of grime that can restrict your vision at night – or when driving in sunny conditions. Apply your glass cleaner to the top half of the windscreen and wipe it away with a microfibre cloth in a circular motion, overlapping and changing directions periodically to ensure you’ve covered the entire area. Then, clean the bottom half, cleaning right to the rubbers. Once you’ve cleaned the windscreen, move on to the side and rear windows. When you think you’ve finished, check carefully for any streaks and smears.
Interior Cleaning
-
Step 1: Clean the Interior Glass
For this stage, you’ll need a set of microfibre cloths, an interior cleaning product, a brush and a vacuum cleaner (ideally a small handheld vacuum). The interior part of the windscreen will accumulate dirt over time. You should clean the interior windscreen panel from the passenger seat to avoid transferring glass cleaner onto the steering wheel. Covering the dashboard with cloths can also protect the surface from cleaner spillages. Once again, clean the glass in circular motions with a fresh microfibre cloth. Check for smears from the outside to make sure you haven’t missed anything. Repeat the same process for the side, rear, rear-view and vanity mirrors.
-
Step 2: Vacuum the Carpet and Upholstery
-
Remove the floor mats.
-
Vacuum the carpets using either a standard vacuum cleaner or a model that can be plugged into the 12V socket.
-
Remove any loose items from the interior. Separate any items you want to keep and throw the rest away.
-
Use a compressed air cleaner to clean difficult-to-reach spots such as the seat seams and handbrake.
-
Push the driver’s and front passenger’s seats back, then vacuum the carpet beneath them, along with the footwells.
-
Using a brush, loosen any stubborn pieces of dirt or pet hairs that catch your eye.
-
Now that the carpet is clean, you can move on to the seats. Upholstery cleaner will work best for cloth seats. If you have leather seats, it’s best to use a specialised leather cleaner and conditioner. When cleaning the seats, start at the back, then move towards the bottom of the seat.
-
Vacuum between the back and bottom of each seat, as dirt and debris tend to accumulate in these areas.
-
Once you’ve finished the driver’s side, clean the passenger side using the same process. Don’t forget the rear seats and carpet.
-
Finally, make sure the backs of your floor mats are free from dirt and grime before returning them to your car.
-
Advanced Exterior Cleaning
-
Step 1: Clay Barring
A clay bar is a putty-like substance that can be used to strip contaminants that would be difficult to remove with standard cleaning methods from the top of the paint. Using a clay bar prior to waxing or polishing the paintwork can leave it feeling smoother. However, you should only use a clay bar when strictly necessary – once or twice a year should be sufficient in most cases. When clay barring, you’ll need the following items:
-
A fine or medium clay bar.
-
A bottle of clay bar lubricant (available from online retailers and high street motoring stores).
-
A bucket of water containing car shampoo.
-
A wash mitt.
Here are the steps to follow:
-
Break off a piece of your clay bar, then knead it into a small, round shape.
-
Dip your clay bar into your shampoo bucket, then use the mitt to squeeze water onto the panel you intend to clean.
-
Spray the lubricant onto the panel, remove the clay bar from the bucket, then place it on top of the paintwork.
-
Guide the clay bar over the paintwork area using a sideways motion.
-
If the clay bar itself becomes dirty, fold it in half and kneed it into shape once more. However, if you drop the bar on the floor, discard it and break off another piece.
-
After you’ve been barring for a little while, you should notice that the clay bar is easier to move. This is a good indication that the area is now free from contaminants.
-
Finally, rinse the bodywork using a pressure washer or hose.
-
-
Step 2: Polish and Wax
Car polish can help to remove light scratches and oxidisation from the paintwork, whilst adding an additional protective layer of wax on top of the polished finish. You can expect a standard all-in-one polish to provide around a month’s worth of protection. If you want more longevity, use a specialised polish and a separate wax product. When polishing the paint, you should use a microfibre cloth (or foam application) and your specialised polish. Next, apply the polish to the cloth, then to the paintwork using straight lines, working polish into one small area at a time. Then, remove the polish using a fresh microfibre cloth. Repeat this process for each panel on the car. It may take a few hours to fully polish and wax your motor. If you have enough time, consider adding another layer with a paint sealant or carnauba wax.
-
Step 3: Deep Clean the Wheels
Whilst the initial wheel wash might have improved their condition, you’ll need to use a specialised wheel cleaner if you want to achieve an authentic showroom finish. These powerful cleaning products can effectively remove any stubborn brake dust and salt caked into your wheels. Wheel cleaners are available in a variety of strengths and formulas, so do your homework and check the labels carefully to decide which product is best for you. Once you’ve chosen your wheel cleaner, here is the process to follow:
-
Spray the surface with your wheel cleaner. Make sure you cover the inner and outer sections of each wheel.
-
Fetch a wash mitt and/or wheel brush and bucket of fresh water and car shampoo.
-
Dip your mitt/brush into the water and loosen the dirt.
-
Clean the face and rear surface of each wheel – and make sure you loosen any dirt between the spokes. Don’t forget to clean the tyre valves and wheel nuts.
-
When you’ve loosened any dirt around a wheel, rinse it using your pressure washer or garden hose.
-
Finally, apply a tyre foam cleaner. Most tyre foam products can be used on wet or dry tyres (but always read the label). Simply spray onto the tyres and let the foam do its work.
-
Maintenance Tips
Once you’ve comprehensively washed and cleaned your car, the vehicle should look and smell fresh. Want to maintain your motor’s showroom sheen a little longer? Make sure you do the following between major cleans:
-
Park in a garage or a covered area when the car is not in use. If you don’t have access to either, use a car cover. This will provide valuable protection from dust, grime and debris.
-
Spot clean any stains and spills to stop them becoming permanent and creating lingering odours.
-
Refrain from eating or drinking in your car.
-
Vacuum the interior regularly between washes.
-
Keep wet wipes in your car and wipe down the dashboard on a regular basis.
-
Avoid leaving food or wet/dirty clothes in your car overnight.
-
If you have any pets that travel with you, cover the upholstery with towels for their muddy paws.
What is the Correct Order to Wash Your Car?
-
Spray down the entire exterior of the car.
-
Clean the wheel wells and the tyres.
-
Wash your car, starting from the top.
-
Towel dry the vehicle in long, sweeping movements, following its contours.
-
Treat any problem areas as required.
Can You Wash Your Car with Just Water?
Simply hosing down your car may be sufficient if the vehicle is just a little dusty. However, if you want to tackle tougher grime, dirt and bacteria, you’ll need to throw soap or shampoo into the mix.
Can I Wash My Car at Home?
Yes, you can wash your car very effectively at home by following the steps we outlined earlier in the article.
Can I Wash My Car at the Petrol Station?
Yes, most petrol stations have car washing facilities such as a hand car wash, rollover car wash or a jet wash. However, bear in mind that automatic car washes may use cloth and rubber brushes that can damage your vehicle’s paintwork and leave unwanted ‘swirl’ marks if used too frequently.